Improving vehicle quality with advanced metrology
Siobhan Doyle explores how advanced 3D metrology devices are improving vehicle quality and safety
Precision is everything in the fast-paced world of automotive manufacturing, where even the smallest deviation can cause costly malfunctions or compromise safety. At the heart of this precision lies metrology – the science of measurement.
From ensuring flawless alignment of engine components to verifying the structural integrity of safety features, metrology plays a pivotal role in maintaining quality. As demand for electric vehicles (EVs) rises, the need for accuracy becomes even more important.
By providing actionable insights, metrology drives efficiency, enhances decision-making, and ensures that precision is embedded at every stage of the manufacturing process.
“Automation and adaptability are key here because EV production is constantly evolving,” says Ignazio Dentici, VP of global e-mobility and automotive at Hexagon’s Manufacturing Intelligence division. “Metrology tools allow manufacturers to adjust scanning procedures through software rather than reconfiguring the hardware, saving additional time and effort.”
THE IMPORTANCE OF ACCURACY
For decades, the study of metrology – which includes the development, application, and improvement of measurement standards and techniques – was viewed as a necessary but cumbersome hurdle, reserved for final quality checks. Any errors meant costly reworks or scrapped parts. Today, advanced metrology solutions are flipping this narrative. With advanced technologies, metrology no longer slows production. Instead, it offers real-time data that bridges the gap between design and execution.
Among the developers of this technology is Hexagon’s Manufacturing Intelligence (MI) division, which engineers advanced metrology tools like 3D laser scanners and coordinate measuring machines. These devices help automotive manufacturers maintain tight tolerances, ensuring precise part alignment and fit.
IMPROVING SAFETY
Metrology plays a huge role in improving safety by enhancing reliability. This applies to structural integrity as well as the chemical and electrical components within EVs. For instance, using volumetric scanning and CT technology, car manufacturers can inspect areas previously invisible, like the porosity of weld seams or overlaps in battery electrodes. These insights prevent potential issues like thermal events or mechanical failures.
“With electrification, safety challenges extend beyond mechanical reliability to include electrical functionality,” Dentici adds. “Electrical failures can sometimes pose greater risks than mechanical ones, so ensuring the precision and quality of EV components is critical. Metrology combined with AI and digital twins helps us guarantee that parts are manufactured to exact specifications, ensuring both performance and safety.”
A SEAMLESS DESIGN PROCESS
3D metrology scanners enhance automotive design by capturing highly accurate, detailed measurements of components. This precision enables engineers to identify design flaws early, refine prototypes faster, and ensure optimal alignment. By improving accuracy, 3D scanners streamline the design process, reduce development time, and boost overall manufacturing efficiency and quality.
“Our laser trackers and scanners provide significant efficiency advantages,” Dentici explains. “For example, our solutions can reduce inspection times by up to 75% compared to traditional technologies. This means enormous cost savings, greater agility, and enhanced flexibility in processes.”
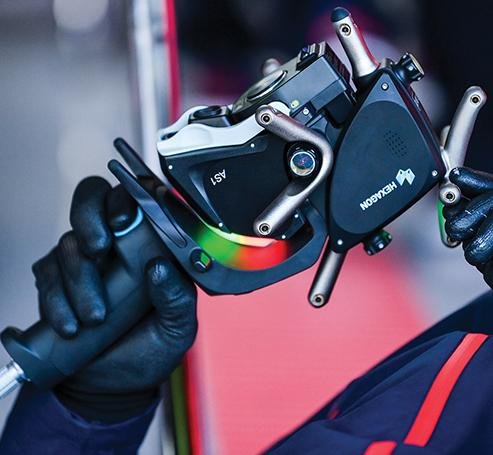
Hexagon’s MI division has developed a modular 3D scanner designed for inspecting large surface and deep cavities. The Absolute Scanner AS1-XL works with both a laser tracker and a portable measuring arm device. It’s also equipped with Hexagon’s Shine technology which allows it to capture clean 3D data at high speed, even from highly-reflective and challenging surfaces.
The AS1-XL’s wide scan line, measuring 600mm at mid-range, combined with its rapid point acquisition rate of 1.2 million points per second and 300Hz frame rate, makes it ideal for scanning large surfaces without sacrificing detail. Its extended stand-off distance of 700mm and hidden point measurement capability of up to one metre further enhance its versatility.
MAKING MANUFACTURING SMARTER
At a time where skills shortages are impeding daily operators for many automotive manufacturers, an integrated robotic system eliminates repetitive manual set-up and calibration processes, enabling teams to work more effectively and focus on operations. These systems can potentially halve total inspection time compared to other modern inspection technologies.
Hexagon MI’s Presto system enhances adaptability in manufacturing by automating robotic programming. Quality control specialists can quickly create and deploy inspection solutions, allowing operators of all skill levels to safely load and inspect parts with ease using a simple control panel.
Presto combines Hexagon’s Absolute Scanner AS1 with the Leica Absolute Tracker AT960 for rapid, precise automated inspections. Its blue laser captures detailed scans, while SHINE technology measures reflective surfaces effortlessly. The software simulates inspections using a digital twin for seamless operation.
POWER AT CARMAKERS’ FINGERTIPS
Automotive manufacturers are increasingly focusing on comprehensive quality inspections, sampling parts more frequently. Robotic systems like Presto seamlessly integrate with existing metrology and quality assurance processes, providing valuable data that helps identify potential issues and drive continuous improvement.
By enhancing measurement accuracy, metrology not only boosts overall quality but also reduces the risk of defects that could jeopardise vehicle safety. And as autonomous vehicles become more prevalent, ensuring precision and reliability in manufacturing is essential to safeguarding the future of transportation.

